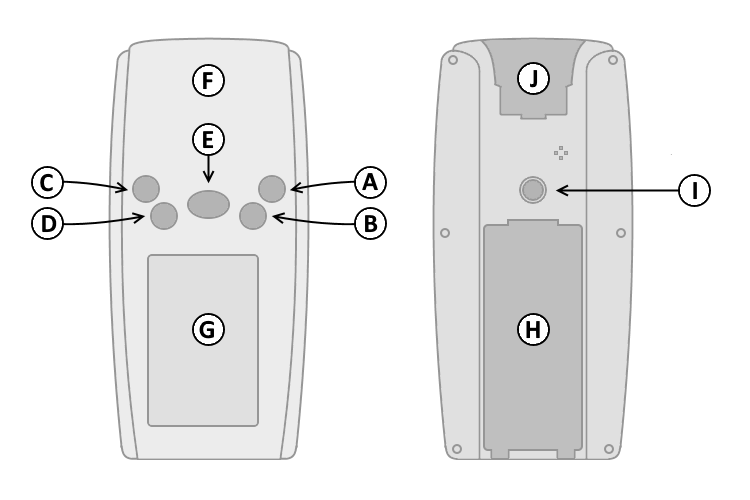
Function - geko 301


Controls


A. Power
B. Page/Quit
C. Up
D. Down
E. OK/Enter
F. GPS Antenna
G. Monochrome Display
H. Battery Cover
I. Accessory Mount
J. Data Port Cover


Button Operation

A. Power Button   D. Down Button
     1. Press and hold to turn unit on/off.        1. Select page and menu options.
     2. Press and release to cycle the display backlight on/off.        2. Zoom In on the Map page.
B. Page Button        3. Adjust contrast (lighter) in the Satellite page.
     1. Press and release to loop through display pages.        4. Cycle Data Fields in Navigation page.
     2. Press and release to exit/quit a function.   E. OK Button
     3. Press and hold to cycle compass on/off.        1. Press and release to confirm data entry or menu selections.
C. Up Button        2. Press and release to view option menu for active page.
     1. Select page and menu options.        3. Press and hold to activate Mark Waypoint page.
     2. Zoom Out on the Map page.    
     3. Adjust contrast (darker) in the Satellite page.    
     4. Cycle Data Fields in Navigation page.    


Special Key Functions


Pages

Press and release the Page Button (B) to loop through available display pages:
 
Normal SkyView Advanced SkyView Map Pan Track Compass Navigation
           
Sight 'N Go Trip Computer Elevation Mark Waypoint Software Version Diagnostic Screen
           
Menu Gekoids Geko Smak Memory Race Nibbons Virtua Maze


Satellite

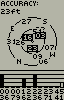
The Satellite page displays (in animation) the geko gathering the necessary satellite information to function.

A "Ready to Navigate" message will appear when the receiver has gathered information from a minimum of three satellites.

The current satellite receiver status and estimated positional accuracy are displayed at the top of the Satellite page.

The bottom of the Satellite page displays a signal strength bar to let you know when satellite signals are weak or when you need to move to a better location.

Press OK (E) to select Satellite page options:


Map

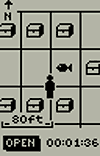
The Map page provides a picture of where you are (animated figure), where you are going (path to destination), where you have been (track log), and waypoint names and symbols.

The geko rotates the Map page as you move such that waypoints that are ahead of you are displayed in front of the animated figure.

The Heading Indicator shows you which direction you are moving.

Press the Up (C) or Down (D) buttons to change the map scale as desired.

Press OK (E) to select Map page options:

See also: An introduction to using Garmin GPSr with paper maps for land navigation.


Navigation

The Navigation page helps guide you to a destination.

Press and hold the Page (B) button to cycle the electronic compass on/off.

Hold the geko level (parallel to the ground) to achieve an accurate compass reading.

When moving without a destination selected, the upper data field displays the current GPS signal status. The compass ring displays your heading.

When moving with a destination selected (navigating), the upper data field shows the name and distance to the current destination. Simply follow the compass arrow to find your destination.

To change the lower data field, press the Up (C) or Down (D) buttons until the desired data field is displayed:

  1. Arrival Time - the estimated time of arrival at current destination, based on current speed and distance.
  2. Bearing - the compass direction from your current location to your destination.
  3. Course - the direction from your starting location to a destination.
  4. Elevation - the measurement of height above mean sea level.
  5. Final Distance - the distance between your current location and the selected destination.
  6. Heading - the direction you are traveling.
  7. Location - shows your current coordinates (latitude and longitude, UTM, etc.).
  8. Speed - how fast you are moving.
  9. Time/Date - the current date and time, based on time zone selection.
  10. Time To Go - the estimated time at your current speed to reach the destination.
  11. Trip Odometer - total distance traveled since last reset.

Press OK (E) to select Navigation page options:


Trip Computer

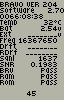
The Trip Computer page displays four different types of navigation data.

Each data field is user configurable.

Press OK (E) to select Trip Computer page options:

To change data fields:

  1. Press the OK (E) button to open the Trip Computer option menu.
  2. Use the Up (C) and Down (D) buttons to select 'Change Fields' and press OK (E).
  3. Use the Up (C) and Down (D) buttons to select desired data field and press OK (E).
  4. Use the Up (C) and Down (D) buttons to highlight desired data field and press OK (E).
  5. Repeat steps 3 and 4 as desired to configure remaining data fields.

Available Trip Computer Data Fields:

  1. Bearing - the compass direction from your location to your destination.
  2. Course - the direction from your starting location to your destination.
  3. Elevation - the measurement of height above mean sea level.
  4. Final Dest - (Final Destination) the last waypoint on your route. 
  5. Final Distance - the distance from your current location to your destination.
  6. Final ETA - the estimated time you will arrive at your destination.
  7. Final ETE - the estimated total time left until you reach your destination.
  8. Gld Rt Dest - (Glide Ratio Destination) the Glide Ratio required to descend from current to destination location and altitude.
  9. Glide Ratio - the ratio of horizontal distance traveled to vertical descent. ("6:1" = 1000' vertical descent per 6000' horizontal travel).
  10. Heading - the direction you are traveling.
  11. Lat/Lon - the current GPS position.
  12. Location - shows your current latitude and longitude.
  13. Max Speed - the maximum speed traveled since last reset.
  14. Moving Avg - (Moving Average) the average speed while the unit is moving.
  15. Next Dest - (Next Destination) the next waypoint on your route.
  16. Next Dist - (Next Distance) the distance between your current location and the next waypoint.
  17. Next ETA - the estimated time you will arrive at the next waypoint.
  18. Next ETE - the estimated total time left until you reach the next waypoint.
  19. Odometer - the running tally of distance traveled, based on the distance between second-by-second position readings.
  20. Off Course - the distance you are off a desired course in either direction, left or right.
  21. Over'l Spd - (Overall Speed) the average speed while moving and stopped since last reset.
  22. Speed - shows how fast you are going.
  23. Sunrise - the time of sunrise for current date and location.
  24. Sunset - the time of sunset for current date and location.
  25. Time of Day - the current time for the selected time zone.
  26. Time-Moving - the time elapsed while the unit is moving since the last trip reset.
  27. Time-Stop - the time elapsed while the unit is not moving since the last trip reset.
  28. Time-Total - the total time traveled since the last trip reset.
  29. To Course - the compass direction you must go to get back to the original course.
  30. Trip Odom - (Trip odometer) the total distance traveled since the last reset.
  31. Turn - the angle difference (in degrees) from the bearing to your destination and your current line of travel. 'L' = turn Left, 'R' = turn Right.
  32. Vert Speed - (Vertical Speed) the rate of altitude gain or loss over time.
  33. VMG - (Velocity Made Good) the speed you are closing in on a destination along a desired course. Also known as the 'vector velocity' to your destination.
  34. Vt Spd Dest - (Vertical Speed Destination) the speed at which you are descending to your destination altitude.


Elevation

The Elevation page provides the user with current elevation, rate of ascent/descent, and a graphical profile of elevation/pressure change over distance/time.

The upper data field displays current elevation status.

To change the lower data field, press the Up (C) or Down (D) buttons until the desired data field is displayed:

  1. Ambient Pressure - the uncalibrated current pressure.
  2. Average Ascent - the average vertical distance of ascents.
  3. Average Descent - the average vertical distance of descents.
  4. Gld Rt Dest - (Glide Ratio Destination) the Glide Ratio required to descend from current to destination location and altitude.
  5. Glide Ratio - the ratio of horizontal distance traveled to vertical descent. ("6:1" = 1000' vertical descent per 6000' horizontal travel).
  6. Maximum Ascent - the maximum ascent rate in feet per minute.
  7. Maximum Descent - the maximum descent rate in feet per minute.
  8. Maximum Elevation - the highest elevation reached.
  9. Minimum Elevation - the lowest elevation reached.
  10. Normalized Pressure - the pressure at sea level.
  11. Total Ascent - the total distance ascended.
  12. Total Descent - the total distance descended.
  13. Vertical Speed - your rate of altitude gain/loss over time.
  14. Vt Spd Dest - (Vertical Speed Destination) the speed at which you are descending to your destination altitude.
  15. 12HRS(Hours) Pressure - a 12 hour graphical representation of the 'pressure plot'.

Press OK (E) to select Elevation page options:


Menu

The Menu page provides access to the geko's essential features and settings.

Press the Up (C) or Down (D) buttons to highlight the desired menu selection.

Press the OK (E) button to activate the highlighted menu selection: