Navigation
Your inReach SE+/Explorer+ satellite
communicator determines your location using the
GPS satellite network.
- Acquiring GPS Satellite Signals
- Before you can use GPS navigation
features, you must acquire satellite signals.
- When you turn on your navigation device,
the GPS receiver must collect satellite data and establish the current
location.
- The time required to acquire satellite
signals varies based on several factors, including how far you are from
the location where you last used your navigation device, whether you
have a clear view of the sky, and how long it has been since you last
used your navigation device.
- The first time you turn on your navigation
device, it may take several minutes to acquire satellite signals.
- To turn on the device, press and hold
 .
.
- Wait while the device locates available
satellites.
- It may take up to 60 seconds to acquire
satellite signals.
- If necessary, move to an open area away
from tall buildings and trees.
- Waypoints
- Waypoints are locations you record and
store on the device.
- Waypoints can mark where you are,
where you are going, or where you have been.
- Creating or editing a waypoint updates
your MapShare page.
- Creating a Waypoint
- You can save your current location as
a waypoint or create custom waypoints.
- To mark your current location as a
waypoint, select Waypoints > New Waypoint.
- If desired, edit the waypoint
information.
- To
create a custom icon, change the waypoint coordinates to the desired location.
- Navigating to a Waypoint
- Select Waypoints.
- Choose desired waypoint.
- Select Navigate.
- Editing a Waypoint
- Select Waypoints.
- Choose desired waypoint.
- Edit Name to change waypoint
name.
- Edit Symbol to change waypoint
symbol.
- Edit Coordinates to change
waypoint coordinates.
- Enter new waypoint information.
- Viewing a Waypoint on the Map
- Select Waypoints.
- Choose desired waypoint.
- Select
 >
View on Map.
>
View on Map.
- Deleting a Waypoint
- Select Waypoints.
- Choose desired waypoint.
- Select
>
Delete.
- Stopping Navigation
- Select
Waypoints >
>
Stop Navigating.
- Routes
- A route is a sequence of locations
that leads you to a selected destination.
- You can create and save routes at explore.garmin.com.
- Navigating a Saved Route
- Starting navigation updates your
MapShare page, and your friends and family can view the route you
are navigating.
- Select Routes.
- Choose a route.
- Select Navigate.
- Viewing a Route on the Map
- Select Routes.
- Choose a route.
- Select
>
View on Map.
- Reversing a Route
- Select Routes.
- Choose a route.
- Select
>
Reverse
Route.
- Deleting a Route
- Select Routes.
- Choose a route.
- Select
>
Delete.
- Stopping Navigation
- Select
Routes >
>
Stop Navigating.
- Map
- The Map page shows your location, sent
and received messages, waypoints and a colored track line connecting
your track points.
- The inReach Explorer+ Map page also
shows streets, points of interest, and topographical information.
- You can customize the information
displayed on the map in Map Settings.
- Navigating with the Map
- The inReach SE+/Explorer+
always use direct routing, and will not create routes along
roads or trails, etc.
- Begin navigating to a
destination.
- Select Map.
-
 represents your location on the map.
- Your route is marked with a
colored line.
- Use the
 to view different areas of the map.
- Press
 to zoom in on the map.
- Press
 to zoom out on the map.
- Sending a Reference Point
- You can send a message that
includes a reference point with details about another
location.
- This feature is useful if you
want to meet someone at a specific location.
- Select Map.
- Choose a location on the map.
- Select Send Reference Point
> Continue.
- Enter desired recipients and
message.
- Stopping Navigation
- Select
Map >
>
Stop Navigating.
- Trip Info
- The Trip Info displays your trip time,
time moving, maximum speed, average speed, trip distance, and trip
odometer.
- For accurate trip information, you
should reset Trip Info before beginning a new trip.
- Select Trip Info > Reset.
- Choose an option:
- Select Reset Trip to clear trip
times, distance and speed.
- Select Reset All to clear trip
information and reset the odometer.
- Compass
- The compass features and appearance
change depending on whether you are tracking or navigating to a
destination.
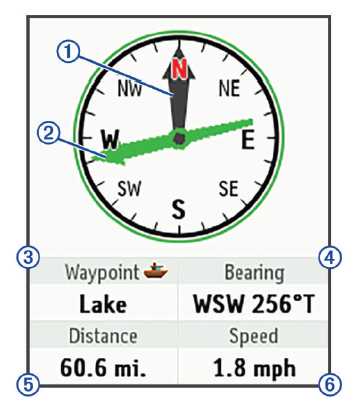 |
1. |
Heading Pointer |
Indicates your
directional heading. |
|
2. |
Bearing Pointer |
Points in the
direction of your destination. |
|
3. |
Elevation or
Destination |
Indicates your
elevation when not navigating.
Indicates the destination name when navigating. |
|
4. |
Course,
Bearing, or
Heading |
Indicates your
course when moving.
Indicates your bearing when navigating.
Indicates your heading when not moving (Explorer+). |
|
5. |
Distance |
When tracking,
indicates distance traveled since tracking began.
When navigating, indicates distance to the destination. |
|
6. |
Speed |
Indicates your
speed. |
- Navigating with the Compass
- Begin navigation to a
destination.
- When you begin navigation,
your friends and family can follow your progress and view
your destination on your MapShare page.
- Select Compass.
- Rotate until the heading
pointer aligns with the bearing pointer, and continue moving
in that direction to reach your destination.
- Stopping Navigation
- Select
Compass >
>
Stop Navigating.
- Location
- You can view your current GPS
coordinates,
speed, course,
elevation, and
accuracy.
- You can also send a message with your
location details from the Location page.
- Select Location to view your
GPS location details.
- Select Share Location to send a
message with your location details

