Creating Custom POI Files
Advanced users can create their own *.csv and
*.gpx files that contain Custom
POIs (points of interest) for use on compatible Garmin devices. Both
*.csv and
*.gpx files are loaded to the device using the Garmin
POI Loader application. After processing the files, POI Loader uploads a
single *.gpi
file to the device.
All POI-related files should be stored in a main directory on the computer.
One level of sub-folders is allowed for organizing files and creating POI
categories. The POI Loader combines all files in the main folder and its
sub-folders to create one *.gpi file. Each time POI Loader sends POIs to a device
the existing *.gpi file is overwritten.
Creating Basic POIs
A basic POI includes the Coordinates (Longitude,
Latitude), Name and an optional Comment field.
- Coordinates: Must be in decimal format (hddd.ddddd).
- Longitude: Use a minus sign for any location West of the 0 degree line or
prime meridian.
- Latitude: Use a minus sign for any location South of the 0 degree line or
equator.
- Name and Comment: Avoid using commas or special
characters in these fields.
Creating a .csv File in a Text Editor
- When entering POI information into a text
editor, use a comma to separate each field and a line break to separate
each POI.
- The longitude is listed first, followed by
latitude, name, and comment.
- The coordinates must be in decimal format
(hddd.ddddd).
- Examples:
- -94,50095, 36.35431, Roaring River State Park, Light-colored worms
- -92,51394, 37,43547, Bennett Spring State Park, Maribu jigs
- -94.76416, 38,81227, Garmin, 1200 E. 151st St.
- Once all of the desired information has been
entered, save the file with a *.csv extension (filename.csv).
Creating a .csv File in Microsoft Excel
- To create a *.csv file with custom POIs in
Microsoft Excel, insert the POI information into the first 4 columns of the
Excel:
- Column A = Longitude
(cannot include any spaces or special characters other than the dash (-)
and period (.) symbols)
- Column B = Latitude
(cannot include any spaces or special characters other than the dash (-)
and period (.) symbols)
- Column C = Name
(avoid using commas or special characters)
- Column D = Comment (optional)
(avoid using commas or special characters)
- Example:
| -94,50095 |
36.35431 |
Roaring River State Park |
Light-colored worms |
| -92,51394 |
37,43547 |
Bennett Spring State Park |
Maribu jigs |
| -94.76416 |
38,81227 |
Garmin |
1200 E. 151st St. |
- Once all of the desired information has been
entered, save the file with a *.csv extension (filename.csv).
Creating a .gpx File in BaseCamp
- GPX (*.gpx) files that contain waypoints can be created in Garmin BaseCamp
and then loaded as custom POIs (Points of Interest) on compatible Garmin
devices using Points of Interest (POI) Loader.
- A GPX file can consist of a single waypoint or a list containing multiple waypoints.
Adding waypoints to a list will help organize the POIs when they are
exported.
- The longitude, latitude and name are all included in the waypoint when
it is created. Comments and proximity alerts can be added to a waypoint in the
waypoint properties window.
- The default export file type is *.gpx.
- To add a comment to a waypoint:
- Double-click the waypoint
- Click the Notes tab (Windows only)
- Enter desired text in the Notes box (Windows) or Comments field (Mac)
- To add a proximity alert to a waypoint:
- Double-click the waypoint
- Click Advanced (Mac only)
- Enter desired distance (in miles) into the Proximity field (between 0 and 24901 miles or 40074 kilometers)
- To export data:
- Select the waypoint or list
- Click File
- Click Export > Export “([Content Name])”
- Enter a file name
- Choose a file location
- Click Save
Creating a .gpx File in
MapSource
- Create a waypoint using the Waypoint Tool, the Find feature, or by
right-clicking on the map
- In the Waypoint Properties dialog box, enter information into the
appropriate fields as needed:
- Name: The name of the waypoint, as well as speed alert information if
desired
- Proximity: To create a proximity alert here, uncheck the Unknown box and
enter the desired distance for the alert
- Comment: Enter a description for the waypoint as desired
- File/URL: Browse to and select the file or directory you wish to
associate with the POIs in this file, including custom icons and
*.mp3 audio
files
- Click OK
- Repeat steps 1-3 as needed for the waypoints you wish to save
- Select File > Save As
- Select the desired save location for the waypoint(s)
- Enter a filename
- If no numbers were entered in the Name field in step 2, POI Loader will
consider any numbers entered here as speed alert information
- Speed and proximity alert information entered in step 2 will override
any other speed or proximity alert information in the file name, such as in
step 7, or manually entered into POI Loader
- From the Save As Type drop down list, select GPS eXchange Format (*.gpx)
- Click Save
- After saving the *.gpx
file, use POI Loader to locate and export this file to your GPSr.
POI Organization:
- All related Custom POI files should be stored in a single primary directory on the computer.
- One level of sub-folders is allowed to improve organization and create POI categories.
- POI categories on the GPS take their name from the sub-folder name.
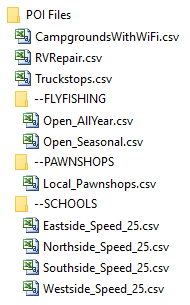
- Example POI Collection:
- The first three *.csv files are in the main POI Files folder while the others are in
sub-folders.
- The POI Loader will create categories on the GPSr based on
the sub-folder names.
- Custom POIs should show up on the device in: Custom POIs > All Categories | --FLYFISHING | --PAWNSHOPS |
--SCHOOLS.
- Placing the dashes at the beginning causes the device to put all sub-folders
together at the top of the list.
- A
speed alert of 25 mph has been set for every school POI in the file.
- POIs
that contain speed alert information cannot be used as a destination point
(The GPSr cannot calculate a route to their location).
- POIs that contain no
alert or only proximity alert information can be used as a destination (The
GPSr can calculate a route to their location).
POI Alerts
Speed and proximity alerts trigger an audio and visual notification on the
GPSr when approaching a POI. Alert information can be included in the POI
name, POI filename, or added with POI Loader’s manual mode when transferring
to a device.
Speed Alert Information
- The POI Loader determines if a file contains speed alert information by
checking the individual POI names and the filename.
- If speed information is included, the GPS will display an alert if the set speed is exceeded while
approaching the POI.
- Speed alerts will repeat until the speed drops below the
set value or the POI is passed.
- If no alert information is found, the POI is
treated as simple destination POI.
- The GPSr can calculate a route to a
destination POI.
- For POIs containing any speed alert information, the GPSr cannot calculate a route and it will serve only as an alert POI.
- Speed information in the individual POI name is
preceded by the "@" sign: “Speed@20”.
- Speed information in the filename
is preceded by an underscore, “Speed_30”.
- Any number below 125 (mph) or
200 (kph) is considered valid speed information.
- POI Loader prioritizes
speed information from highest to lowest priority: Speed information
included in the individual POI name will retain the alert regardless of
the filename or information entered in manual mode. For example, a POI
named "SpeedZone@30" will have an alert speed of 30 even if the filename
is “SpeedZone_20” and manual mode is set to 20.
- Speed information entered in POI Loader’s manual
mode is applied to individual POIs with no speed information in their
name and will override speed information in the filename.
- Speed information included in the filename,
“School _20.csv” applies the value to individual POIs in the file with
no speed information.
Proximity Alert Information
- Proximity alerts can be created with a minimum distance of 0 feet or
meters, and a maximum distance of 200,000 feet (37.88 miles) or 60.690
meters (60,69 kilometers).
- Proximity alerts are triggered by speed information, keywords in the POI
name or filename, information entered in manual mode, or entered in
BaseCamp’s waypoint properties proximity field.
- Including specific keywords in the POI name or filename will trigger
proximity alerts:
- GATSO
- mobile
- SPECS
- safety
- speed
- redlight
- camera
- If a POI filename contains one of above keywords, but does not have any speed information,
POI Loader will use an alert speed of 0, which always generates an alert on
the GPSr at a
distance of 400 meters or .25 miles.
- Proximity alert information can also be added to individual POIs using BaseCamp.
- To add proximity information to a waypoint in BaseCamp:
- Double-click on a waypoint in My Collection or a
List
- Enter a value from 0 feet to 24901 miles in the
proximity field
- The proximity alert information is included in the exported *.gpx file.
- The POI Loader prioritizes proximity alert information from highest to
lowest priority:
- Proximity alert distance in individual POIs
in a *.gpx file. This information overrides all other proximity alert
information.
- Proximity alert distance entered in manual mode.
Maximum distance that can be entered in manual mode is 37.88 miles.
- Proximity alert distance calculated by POI Loader
based on speed information in the individual or filename names.
- This calculation uses the following formula: Prompt Distance = 36 seconds
* Speed.
- In this formula, the speed value represents the value
in the individual POI or filename, not the speed of the GPS when the alert
is triggered.
- Convert miles an hour to miles per second (Prompt distance =
36 seconds * 20 miles / 3600 = .2 miles or 1056ft).
- Regardless of the
vehicles approaching speed, the alert distance will remain the same.
- The same formula can be used for kilometers per hour.
- In addition to alert
information, custom icons can be associated with Custom POIs.
Custom POI
Symbols
- Custom symbols can be used with POIs on most Garmin GPSr.
- The symbols are displayed on the map to mark the location for each POI.
- POI Loader integrates the associated *.bmp image file into
the *.gpi
while loading.
- Custom symbol images must be located in the same directory as the *.csv
or
*.gpx files for POI Loader to process them correctly.
- The image must also be in the proper format, size, and color palette:
- Format *.bmp
file type
- 8 or 16 bit RGB color palette
- 24x24 pixels in size
- Transparency color is Magenta (RGB: R=255, G=0, B=255)
- The *.bmp
file name must be identical to the *.csv
or
*.gpx file
name
- BaseCamp can add a custom symbol to an individual point
in the waypoint properties window.
- Double-click a waypoint to open the properties window
- Click the Notes tab
- Click Add File button
- Browse to the image file
- Click Open
- When asked to create a new geotagged photo choose
'No'.
- When POI Loader processes the exported
*.gpx file it
will include the file in the *.gpi
file on the device.
- Custom waypoint and POI symbols are available from many sources,
including
GPSrChive and
POI Factory.
- See our
Custom POI Symbol tutorial for additional details.
TourGuide Files
- TourGuide files are created by private users or third-party developers. Garmin does not create or support the creation of TourGuide files.
The TourGuide feature is available on Garmin devices with MP3 players.
- TourGuides consist of custom POIs joined with descriptive
*.mp3 audio files
and accompanying *.jpg images. TourGuide POI are chosen as a destination from
the Custom POI menu, and when approached the device plays the
*.mp3
file and displays the associated image.
- A TourGuide consists of one *.gpx file that includes waypoint information for
each location and a matching *.mp3 and
*.jpg file
for each location. All files should be saved in a single directory on the
computer. One level of sub-folders is allowed to improve organization. POI
Loader integrates all 3 files into the *.gpi file when loading to a device.
- All associated files must contain the word "TourGuide" in the filename to
activate the TourGuide feature on the GPSr (T and G must be capitalized). Do not use any keywords or special characters like the “@”
symbol in the filenames. For example, "TourGuide.mp3," "TourGuide USA.mp3"
or "TourGuideOKCORRAL.mp3" are all valid TourGuide filenames.
- Common TourGuide folder structure:
~\Documents\Main Folder\TourGuide.gpx
~\Documents\Main Folder\First POI\ {TourGuide.mp3 and
TourGuide.jpg files for first POI}
~\Documents\Main Folder\Second POI\ {TourGuide.mp3 and
TourGuide.jpg files for second POI}
~\Documents\Main Folder\Third POI\ {TourGuide.mp3 and
TourGuide.jpg files for third POI}
- When creating the POIs in BaseCamp, use the waypoints properties window to
add the *.mp3 audio and
*.jpg image
files from their respective folder to each waypoint. BaseCamp includes the
proper relative link to the files location. This is a necessary addition for
when the POI Loader creates the *.gpi file.
- To add files to a waypoint:
- Double-click a waypoint to open the properties window
- Click the Notes tab
- Click Add File button
- Browse to a *.jpg or
*.mp3 file
- Click Open
- When asked to create a new geotagged photo choose
'No'.
- The default proximity alert distance for a TourGuide
file is 0.25 miles. The manual mode in POI Loader can be used to override
this setting. Individual proximity setting can be set for each waypoint in
BaseCamp using the waypoints properties proximity field covered earlier in
this document.
- Custom POIs are a popular topic with a lot of resources available online
which provide hints, tips, and tricks, along with detailed explanations on
how to utilize POIs in different scenarios.
- Except for the basic handhelds and older Rino 2-way radio GPS devices, all
current outdoor and automotive products are compatible with Custom POIs. TourGuide POIs are only compatible with MP3-capable nüvi and zumo devices. Check the particular Garmin model’s spec sheet for Custom POI compatibility.